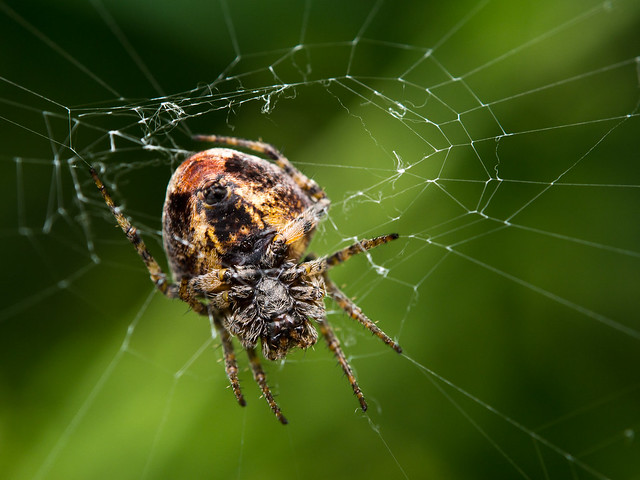
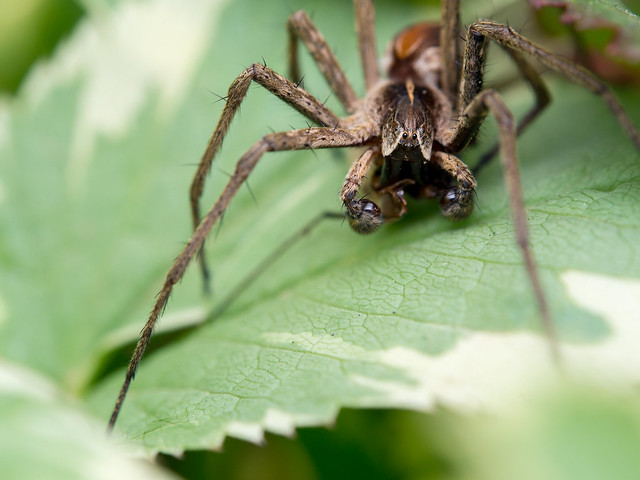
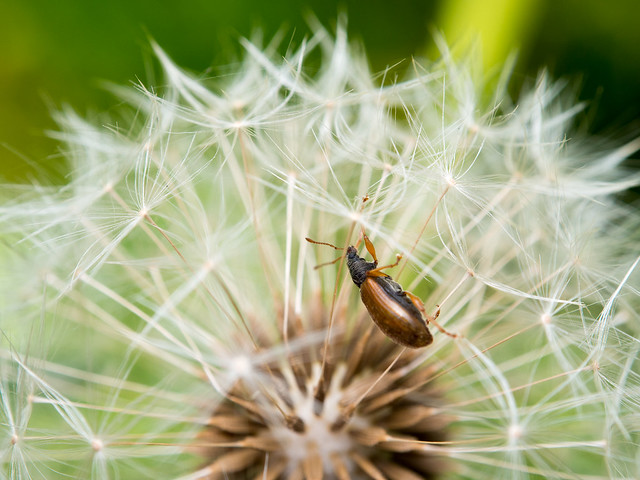
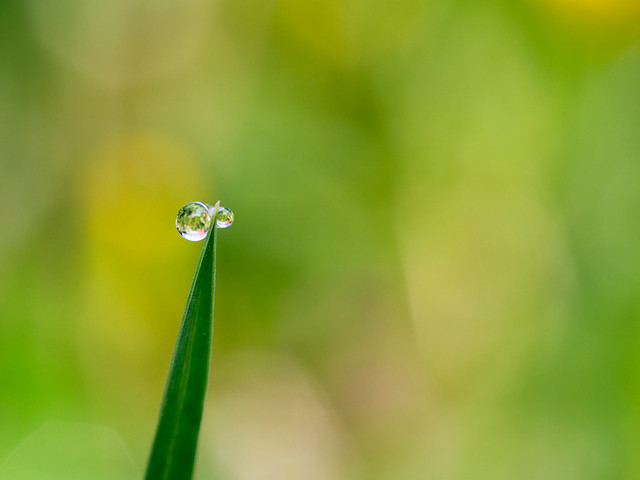
Photographers often use lenses for subjects they are not primarily designed for. Macro lenses, for example, often double as portraiture lenses – especially the ones with medium-long focal lengths. But how about doing it the other way around and using a dedicated portrait lens – such as the Olympus 45mm f/1.8 for micro 4/3 – for macro photography? Not a good idea? Well, no, not if you are only going to use the portrait lens. But if you attach one or two close-up lenses, you will be surprised what can be done with that kind of set-up. Take a look at the following photos I’ve shot with the Olympus OM-D E-M10, 45mm f/1.8, Marumi DHG200 (read my review here) and Raynox DCR-250. It’s important to note that none of these images were cropped.


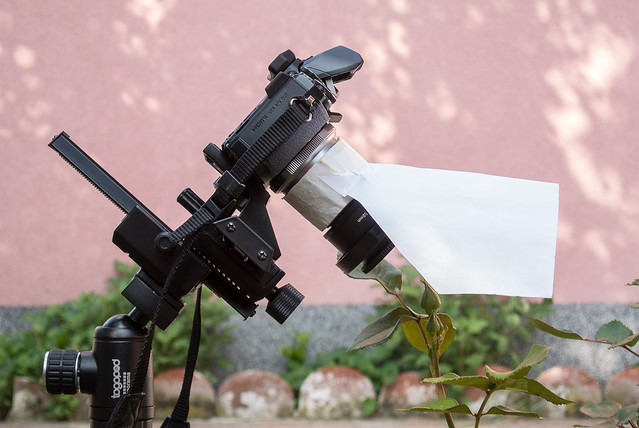
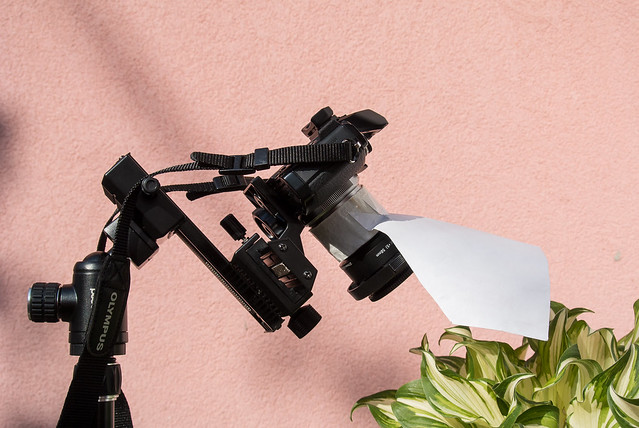
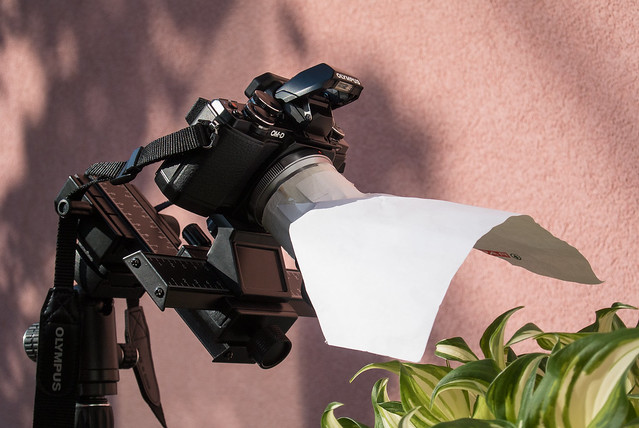
Let’s take a look at the set-up:


I’m guessing what you are most interested to find out, is how close you can get to your macro subjects with a set-up like this one.
Magnification Ratio
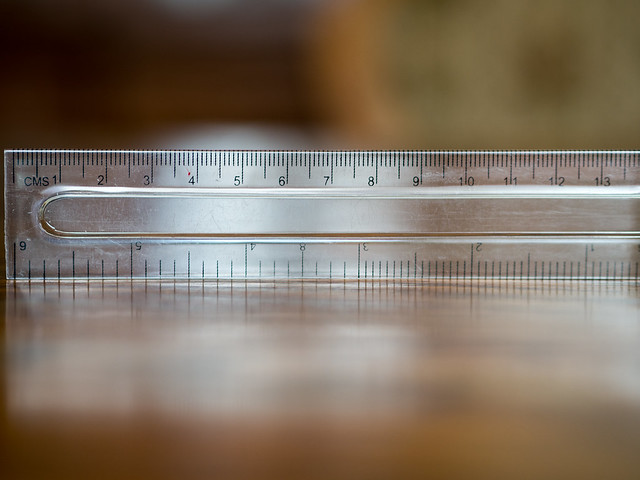
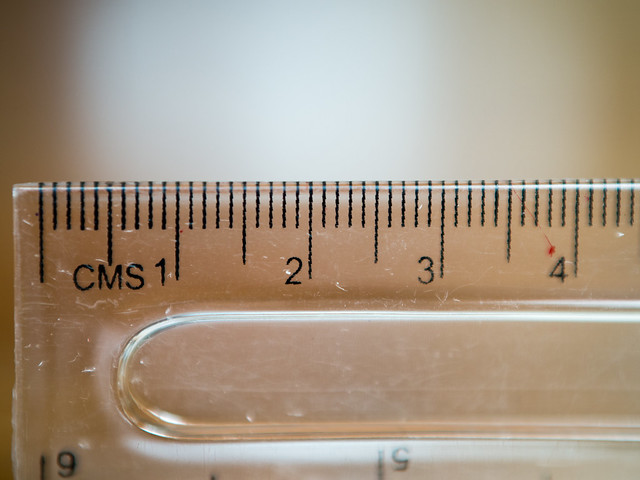
As you can see in the first photo, the Olympus 45mm f/1.8 is not one of those non-macro lenses that can focus very close. Without one of the aforementioned close-up lenses attached, you can expect to fill the frame with a subject not smaller than 14cm or 5.51”.
When you attach the Marumi DHG200, which is a 5-diopter, minimum focusing distance reduces considerably and instead of a 14cm wide/long subject, you can fill the frame with a subject that measures less than 5cm or 2”.
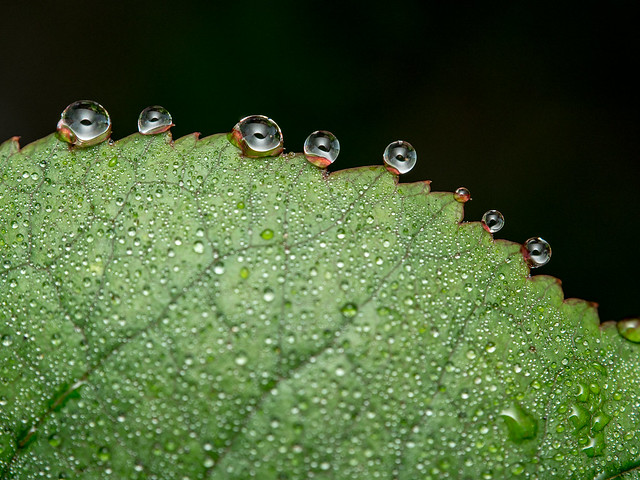
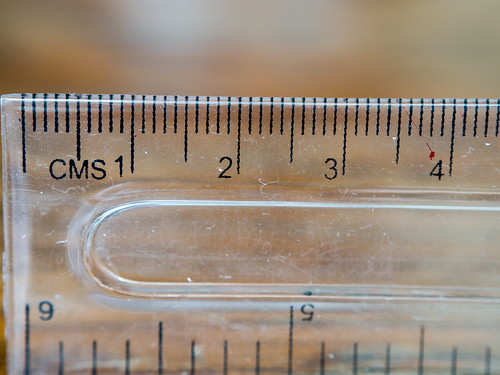
After adding the Raynox DCR-250 (8-diopter) on top of the Marumi, minimum focusing distance gets reduced even further. Magnification ratio doubles to approximately 1:1.4, as now a subject less than 2.5cm or 1” in size can fill the frame. This is very close to a dedicated macro lens with a 1:1 magnification ratio.
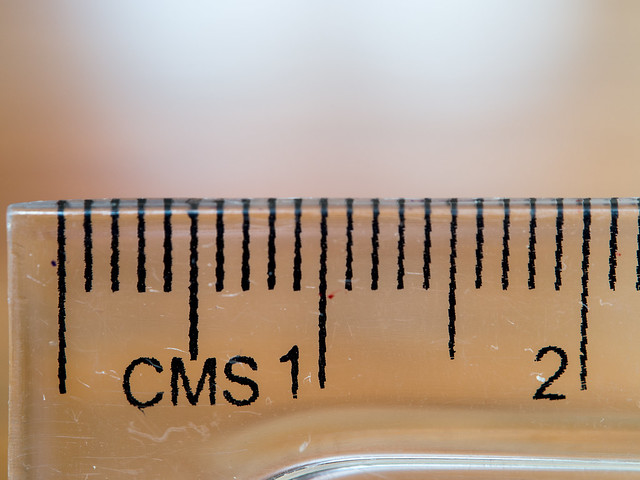
Image Quality
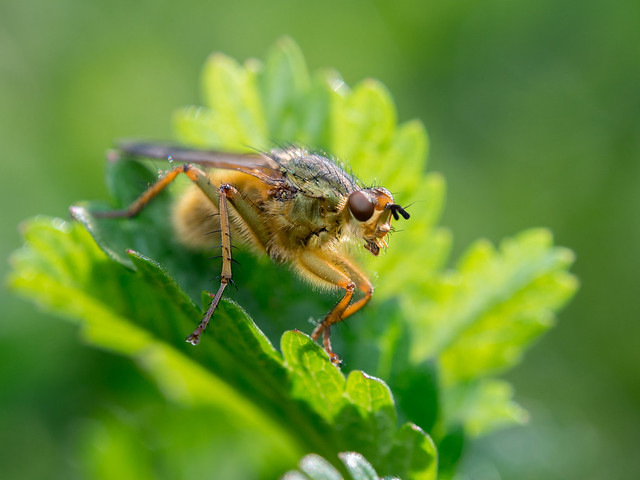
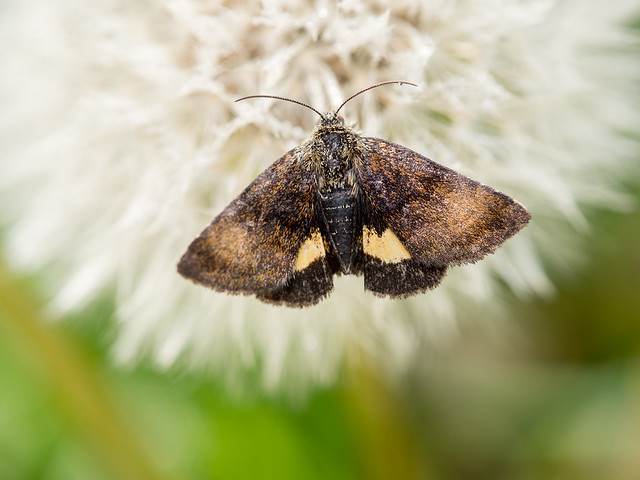
Olympus’ 45mm f/1.8 lens is known for its excellent image quality. Fortunately its IQ stays great after you attach the two achromatic close-up lenses. The two images I’ve included down below are 100% crops of the photos at the beginning of the article. Click on the images to view them full size in a new browser tab!


Flash and Diffuser
I’ve been very stubborn in the past regarding flash usage. I’ve considered myself an ambient light only photographer and as such haven’t considered the “secret art” of flash photography to be something worth getting an understanding of. After shooting macro with the Ricoh GRD3 and experimenting with its built-in flash and a DIY diffuser, I’ve seen the light (no pun intended!). Now I only shoot macro without flash with the Nikon 1 V1, because it doesn’t have a built-in flash and I don’t own one of the Nikon 1 flashguns. All of the macros in this article were illuminated with the OM-D E-M10’s built-in flash through a do-it-yourself diffuser made of paper. You can see what it looks like down below.
I would urge everyone who hasn’t done it already to try using flash when shooting macro. It makes life so much easier. Shooting handheld is a breeze. But even if you prefer to use a tripod, images turn out so much crisper and you are much more flexible in every way, since you can overpower bright backgrounds and use base ISO for best image quality.
Handheld or Tripod?
I’m a sloth bear myself, which is why I mostly shoot handheld even though I have a nice tripod and a macro focusing rail. I find the two a lot more useful when shooting product type photos indoors than when shooting macro in the field. Even so I plan to use the two accessories more often in the future. That being said, there really is no right or wrong way of shooting macro, especially if you use flash.
Camera Settings
Camera settings are dependent on the specific circumstances you are shooting in and the gear you are using. With my gear I usually set aperture to f/8 and shutter speed to the shortest flash sync speed, which is 1/250th of a second. I mostly use single point AF and move the AF box to where I need it. I only switch to MF and turn on focus peaking if the AF repeatedly fails to lock focus, which happens almost never. Since the OM-D E-M10’s built-in flash is rather weak, I set it to full power and set the sensitivity to ISO200. Lowering flash output or ISO is not an option, because photos tend to turn out underexposed.
—————————————————————————————————————————
I guess the bottom line is that if you are a micro four thirds shooter primarily interested in portraiture, but would also like to get a taste of macro photography, getting one of the affordable portrait lenses (Olympus 45mm f/1.8, Panasonic 42.5mm f/1.7 OIS or Sigma 60mm f/2.8) and a couple of achromatic close-up lenses is one of the cheapest ways you can do that. The two achromatic close-up lenses will set you back around 100 to 120 bucks, which is quite affordable compared to a dedicated macro lens like the Olympus 60mm f/2.8. If you prioritize macro over portraiture, however, then why are you even reading this article? Get yourself an Olympus 60mm f/2.8. 😉
This is how you can support BigStreetGuns
If you’ve found this post useful and intend to buy a Marumi DHG200 or a Raynox DCR-250, please consider making your purchase at amazon, by using the following links: AmazonUS, AmazonUK, AmaszonDE
You won’t pay a dime more than when making a direct purchase at amazon, but I will receive a small commission. Thanks for the support! 🙂
Follow me on:
![]()
![]()
![]()
![]()
![]()

You look like your having a lot of fun with that setup – GREAT images!
Thank you Joni! I’m enjoying shooting with this set-up. I only wish E-M10’s built-in flash was a little more powerful.
Thanks for this interesting report. I’m thinking about getting a macro lens for my 45/1.8 but not sure which one of the two you mention here would suit me better. Could you please show the magnification you get with the Raynox only? if the magnification is higher than the Marumi alone and image quality is good then I might prefer it over the Marumi.
I reshot the ruler.
With Raynox DCR250:
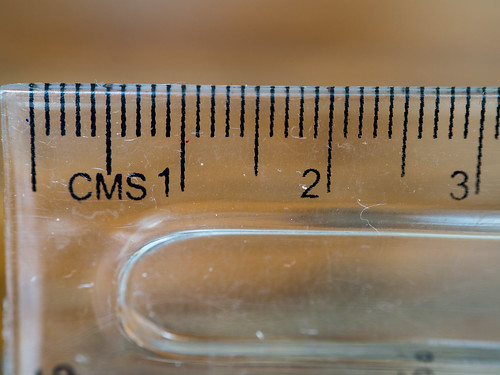
With Marumi DHG200:
Thanks!
You are welcome!
great review on the macro and your accessories and great shots ! I found you via FlickR and I just read your review. I would like to buy this Marumi :)) but can you tell me if i need a ring to put on my 45 mm ? before the Marumi ? it looks like there is one your picture, a ring before the marumi dhg 200, am i right ? thank you !
Thank you Martine!
Yes, your are right. What you need is a 37mm to 52mm step-up ring, like in the pictures below.
Fantastic !! Thank you so much ! i am gonna look for both of them now 🙂
You are welcome! 🙂
[…] Raynox DCR-250 alone. Since buying it I have only used it in tandem with the Marumi DHG200 (read this […]
[…] finished making a macro diffuser for my Meike MK320. Unlike the first version of the diffuser (see here), which was intended to work with the built-in flash of my Olympus OM-D E-M10 and was made of paper […]
hi, if i were to put the raynox 250 to the 45mm oly, do i need an adapter ring or something similar? thankss
Hi Francisca,
yes, you need a step-up ring with any diameter between 52mm and 67mm. I would recommend getting a 37mm to 52mm step-up. That’s what I use. You can see it in the following photo:
Great article/review, thank you! I’ve read the Raynox DCR-150 may be better to start with, as it’s harder to take good pictures with the 250, though it is more powerful. Were all of your above shots taken handheld? If so, I see no reason why not to go with the 250! Also, do you think not using the diffuser would make a big difference in terms of the output? Might be a bit tricky to fashion if you’re on a hike etc.
Thanks again!
Thank you Zak!
I shoot handheld 95% of the time. Almost all, if not all of the above photos were shot handheld.
I agree. You can learn to use the 250 with time, but you can’t make the 150 into a 250, should you discover that you need more magnification than the 150 offers.
Without a diffuser the flash can’t illuminate the subject at all. The light from the flash is blocked by the lens/close-up lens combo.
It’s not a problem if you make one out of paper, like I did. You can fold it up and store it away in your camera bag.
You are welcome!
Just ordered both through your link 😉 Keep up the great work!
Thank you very much! 🙂
I have the Olympus 45mm and Raynox 250. Isn’t this enough to start out in Macro? I’m thinking of getting the Olympus 60mm macro soon
Hi Bryan!
Yes, that’s more than enough when starting out. With the Raynox and the 60mm you’ll be able to shoot some very awesome super macros. But it won’t be easy. At that kind of magnification using focus stacking is a must.
It’s already hard as it is, doing handheld with the Olympus 45mm and Raynox 250 on the GH5 🙂 The dof is really razon thin, it’s very hard with fast-running insects like ants!
Well, ants are hard no matter what equipment you use. With fast insects it’s best to get up early and shoot them while their metabolism is still slow.
Thanks Ivan for the interesting article! I have only one question. What is the minimum focus distance with:
– only MARUMI
– MARUMI + RAYNOX
I believe that we should get too close to the subject with this combination of lenses.
I await your response, thanks
Hey Angelo!
I don’t have my MFT equipment with me and I’m not going to have it for several months. I won’t be able to check what the actual MFD is. But if memory serves, it is very short with both achromats attached. We are talking 10cm or less. It’s too short for skittish subjects.
Regards,
Ivan
[…] As you can see, even with two very strong close-up lenses you can’t really use the Nikkor for serious macro work. Portraiture lenses for other systems, like the Olympus 45mm F1.8 for micro 4/3, can be used for macro more successfully and therefore offer additional value. If you are interested, read my following article: Shooting macro with a portrait lens: Olympus 45mm f/1.8, Marumi DHG200 and Raynox DCR-250 working in… […]
Ivan, what tripod are you using here and what kind of rail (is it the MENGS one)?
I was using a Togopod Explorer Max and this rail: https://www.amazon.de/gp/product/B009WKRNAE/ref=ppx_yo_dt_b_asin_title_o02_s00?ie=UTF8&psc=1
I have to link to it because it is not made by a big brand and has no name. So take a look at the product pictures and try to find it.